Categories
Uncategorized

Duplicating an existing item

Copying an item that is already on the market is a topic that continues to come up no matter what kind of manufacturing business you have.

The guys running machine shops, for example, are very familiar with people walking in off the street wanting a special washer, or bracket made. Often they are very upset at being told that the doohickey they could purchase at WalMart for $20 will cost hundreds or thousands to make. Why does this happen?

Let’s say you broke a part for a lawnmower. It’s a very simple piece of metal with three holes that is bent into a Z shape. It looks like a 5 minute job.

So you walk into a sheet-metal shop and ask how much it would cost to have one made, since you can’t wait a week for a replacement to be shipped. They shop foreman looks at it and says $500.

Why does it cost $500? Well, someone has to take that part, measure each dimension, measure the distance of each bent section, the offsets to all the holes, measure hole dimensions, material thickness, etc. Then the raw metal stock has to be retrieved from inventory, marked out, cut to size, drilled. The bender has to be set up, metal bent, edges deburred, etc. And that’s assuming that the shop even has the free time to get to it within a  reasonable time and that no jobs in progress have to be stopped. Under the best case, it could easily take half a day to make the first bracket. Of course, the next 500 could be made in the next half day now that all the design and setup work is done, but you only need one, so that doesn’t matter.

Much easier to just order it online for $15 + shipping!

It’s no easier in our world of electronics. In fact, it’s complicated by the fact that most of what we do involves the invisible aspect of software. A seemingly simple item that has a parts cost of $10 and sells for $100 could have $20,000 of engineering time behind it to create the first unit. Sure,  as a hobbyist you could copy it and do an awesome job and in the end it only cost you $10, but that ignores the cost of your time. If you’re doing it for fun, who cares about accounting for the time? The problem comes when you need someone else to do all or some of the work for you. Even without the overhead of a large engineering firm, that $100 item could still end up costing you $10,000 to make the first unit.

What does all that extra money pay for?

  • Documentation: how to build the next 5,000 units after that first one is done
  • Packaging: designing the enclosure it goes into and where the pushbuttons and LEDs go
  • User interface: does it have a display? Should multiple languages be supported? Is the flow from one screen to the other smooth and intuitive? It’s really easy to build something for your own use, but much harder when it has to be usable by a wider variety of people
  • Parts selection: which components should be used? Who to buy them from? Is anything critical about to be discontinued?

This is only scratching the surface. The point is that very often, asking to duplicate the functionality of a professionally designed item will require an equally professional designer and there won’t be any cost savings. Unless you need something customized for your needs, it is almost always far less expensive to buy an existing item off the shelf.

So, if you do need something specially built, how do you go about it?

Well, in an ideal world you’d have a complete set of requirements, or a detailed specification. In the real world, you typically only have an idea of what you want and need the details filled in.

So, the engineer you’re working with may need to know the answer to questions like:

  • Do you need just one, or thousands?
  • Will it use battery power or plug into a wall outlet?
  • Does it need to fit into another assembly?
  • If it measures something, how accurate does it have to be? More accuracy than needed can be expensive!
  • Will it be outside and need to be protected from the elements, or in a nice, clean office environment?

Developing a brand new product, or even a variation of an existing one, is a collaborative process. As you discuss your needs, you may find out that there are many small details that are actually important, but you haven’t had the opportunity to think about before.

In our prototype-building work, we come across this quite often. In the process of discussing a need, often the client realizes that there’s something off the shelf that could be modified instead. And it will cost a lot less than a custom design!


If you'd like to subscribe to this blog, please click here.
Categories
Arduino control Uncategorized

Arduino Programming: About time

Time is probably the most commonly controlled process variable. Timers are all over the place in industrial control. Odds are, if you need some type of timer, no matter how strange, you can find it off the shelf.

Now, many of these timers used a chip usually referred to as the “555.” The LM555 originally made by (I think; someone will correct me) National Semiconductor was a very versatile device, but it was at the heart of many time-delay relays, short timing circuits, etc.

So once upon a time, if you wanted to build a basic timer, odds are you would wire up a 555 into a circuit. To build a handful, or just one, you’d use a perf board,

perfboardmaybe you might use wire wrap or even dead-bug construction (my favorite!)

deadbug

It would be time consuming,but maybe you had no choice because the timer had some weird requirement that no off the shelf timer had, or needed to fit into an oddly shaped space.

What does this have to do with Arduinos? Well, you can program any timing sequence into an Arduino. Say you want the heater on a commercial ironing board to come on for five seconds when the operator lowers it, a 555 does it easily. If you want the heater to come on for five seconds and when the board is raised again, a fan to blow for 10 seconds to cool the clothing, the 555 can still be used. Maybe you need two of them. But now, the Arduino becomes an easier solution. Whether you need one time sequence, or dozens, a single Arduino can be programmed to do it. When you factor in the labor of wiring a circuit board with the 555, the low off the shelf price of the Arduino makes it even more attractive.

This is the wonder of the time we live in: an off the shelf microprocessor board is now inexpensive enough to be used for logic replacement.

Amazing


If you'd like to subscribe to this blog, please click here.

Categories
Uncategorized

Arduino Programming: stuff we forget

This post will probably grow over time as I add suggestions from you guys. I see a lot of posts online from Arduino enthusiasts who want to build one thing or another. It’s easy to think of which Arduino version you need and the sensors, actuators, etc. The problem is that we forget all the small, incidental things and those costs can add up. When you’re making up your Bill of Materials (BOM), it helps to remember all this “extra” stuff you might not think of right off the bat so you get a good idea of what it will all cost.

So, what do makers/builders often forget?

  • Power. You need a power supply if you’re not planning on keeping your project connected to a USB port. And sometimes even if you are, you’ll need extra power to drive that motor, or multiple supply voltages because you can’t/won’t use a regulator
  • Enclosure. Is it going to be outside? Probably need a NEMA4-rated box. Even if it’s kept inside, a pretty enclosure is a great way to finish up your project and make it look professional.
  • Wire. Yep, something as basic as wire can really add up, especially if you need multiple gauges or ratings
  • Connectors. Round is better. Drilling holes is easy even with cheap tools. Making square, trapezoidal or just plain weird shaped holes is not. Well, not unless you have a machine shop at your disposal. If you do, maybe we can help each other!
  • Tools. Can you drill all the hole sizes you need?


If you'd like to subscribe to this blog, please click here.

Categories
Uncategorized

Android Bluetooth serial port communication

Tablets and smartphones are everywhere and prices are dropping fast.  A tablet provides a great user interface: it’s inexpensive, has a high resolution color touchscreen and it’s an ideal method to control an embedded system.

The most straightforward way to do this is with an embedded system exposing a web  interface over Wi-Fi. In this case, the tablet only needs a browser to connect. However, smaller embedded systems may not have this luxury. Here we will look at using an Android tablet to connect to a small embedded system using Bluetooth.

We won’t get into the details of the embedded system but for clarity’s sake, let’s say it’s a small Arduino measuring room temperature and connected to a Bluetooth transmitter. It sends a reading automatically once per second.

There is a lot of information online about using Bluetooth with the Android. The problem is that it is fragmented and few sites have all the information in one place. So I figured I’d compile a set of the major points you need to know to get the Bluetooth Serial Port Protocol (SPP) working on an Android app.

First, your app needs the BLUETOOTH and BLUETOOTH_ADMIN permissions. This goes in yourAndroidManifest.xml file.

<uses-permission android:name="android.permission.BLUETOOTH" />
<uses-permission android:name="android.permission.BLUETOOTH_ADMIN" />

Now that we have given the app permission to access the Bluetooth API, let’s look at the classes that are relevant. We’ll need the BluetoothAdapter, BluetoothDevice and BluetoothSocket classes to connect to the external system.

First, we need to find and pair with the device. The following code snippet builds a collection of Bluetooth devices that were discovered by your Android device.

    BluetoothAdapter bta = BluetoothAdapter.getDefaultAdapter();
    bta.startDiscovery();
    Set deviceList = bta.getBondedDevices();

Now that we have a list of external devices, we can iterate over the collection and extract the name and address of each device like this.

    for (BluetoothDevice i : deviceList)
    {
        String name = i.getName();
        String address = i.getAddress();
    }

You can select which one you need from the list and connect to it. Selecting the device is something you can decide how to handle yourself. Connecting to the device is done using its Bluetooth address. Once you have a selected device, we connect to it by requesting the device through its address. The address is a unique 48-bit ID assigned to each Bluetooth device.
Once we have the device, then we’ll open a socket using the standard UUID for the SPP serial port protocol to indicate that we want to connect to the device as if it were a standard serial port.

    BluetoothAdapter bta = BluetoothAdapter.getDefaultAdapter();
    BluetoothDevice device = bta.getRemoteDevice(address);
    BluetoothSocket socket = null;
    if (device != null)
    {
        UUID serialID = UUID.fromString("00001101-0000-1000-8000-00805F9B34FB");
        try
        {
            socket = device.createRfcommSocketToServiceRecord(serialID);
        }
        catch (java.io.IOException e)
        {
        }
    }

Next, we’ll handle sending and receiving data from the socket.


If you'd like to subscribe to this blog, please click here.

Categories
Uncategorized

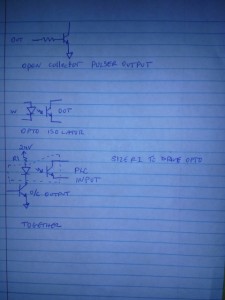
Open collector output connection

20150513_080103


If you'd like to subscribe to this blog, please click here.

Categories
Uncategorized

Trimmable setpoint voltage divider

Let’s say you’re using a comparator like the venerable old LM339. You provide a setpoint “reference” and an input. If the input is below the setpoint, the output is clamped to ground. If the output is above the setpoint (plus any offset voltage of the comparator, of course), the open-collector output floats. Normally we tie the output to +5V if we want a TTL level output as we are often using the comparator to send a signal to a digital or microcontroller circuit. With me so far? OK.

The classic voltage divider is a good choice for a setpoint if it only needs to stay constant. But what if you need a variable setpoint? Simple, use a trimmer, trimpot, variable potentiometer, whatever you wanna call it. Now you can change the voltage of the setpoint. But wait a minute. If we have a regulated 12VDC and use a trimpot, even an expensive multiturn, it can still be difficult to set that voltage to within a millivolt. After all, a 10-turn pot with 12V at the input is still 1.2 volt per revolution, so with 360 degrees per revolution, you’d need fingers precise to almost 1/3 of a degree to set it to within a millivolt. Possible, but difficult.

Like most things, there are multiple ways to skin this particular cat (I can only write this while Lefty and Poncho are not in the room…).

20150424_194031

In the olden, golden days, engineers with beards and slide-rules used verniers that geared the output down, so one turn of the knob might only be 1/10th turn of the potentiometer on the output.
vernier

This makes it easier to adjust, but those things are $$$. Gotta be a cheaper solution. Sure, use a voltage divider. Remember the divider can take an input voltage and give you a smaller output, but if we make the divider variable, we can make it so we only vary it by a small amount. So instead of trying to adjust a 0-5 volt range with a potentiometer, we can design the divider so we only have to adjust a 0 – 0.1V range with the same pot. Much easier!

vdiv

Say Vin is 12V, R1 is 10k and R2 is 820Ω. Vout is then 0.91V. If we insert a 1k potentiometer between R1 & R2,that means that the output can now vary about that point.

divider

So, how does this work? Let’s assume the pot is all the way in one direction, the voltage divider is then 1,820÷11,820 x 12 = 1.85V

with the pot all the way in the other direction, the output is 820÷11,820 x 12V = 0.83V

Nice! So now our trimpot only has to control a span of about 1V instead of a span of 12V. With high-resolution A/D converters and digital inputs, these basic techniques aren’t  used a lot these days, but they are still useful to have in your toolbox.

Now go design something!


If you'd like to subscribe to this blog, please click here.

Categories
Uncategorized

Sensors for counting objects

In order to count anything, we need to detect it first. This usually means some kind of sensor. The sensor used will typically provide a signal that our counter can read. Most such sensors actually function as a type of switch because their output terminals are closing a circuit on the counter electronics that causes a count to increment.

The simplest sensor used to count objects is an actual physical switch. Microswitches are switches with very sensitive contacts: a light touch is all it takes to register the presence of an object. Often microswitches are made with levers to reduce the force needed or to have a greater reach.

lever-switch


One common application for this type of switch is in coin counters for arcade games. The coin falls through a slot,  tripping the lever as it rolls past the switch. The main advantage of microswitches is their low cost and reliability. A disadvantage of this type of counting sensor is that physical contact with the switch is required and the force required to trip the sensor can affect the object you’re counting.

Another common sensor type used as input to counters or object detectors is a photoelectric switch. This optical sensor detects the interruption of a beam of light, often invisible infrared light. For example, to count boxes on a conveyor belt, an emitter, typically an infrared LED shines a focused beam of light across the belt. When the beam is reflected by an object passing by on the belt, the detector sees the returned light and closes a circuit and this sends a pulse to the counter module, updating the count of items going by.

photo

Optical sensors have the advantage of not requiring contact with the switch, but may not work well in dirty or dusty environments where the optical signal may be blocked. Also, this type of sensor used for counting reflective items can be “fooled” by multiple reflections, causing an inaccurate count. In this case, a through-beam sensor, where the item must pass between the LED emitter and its detector, is often more reliable.

Magnetic sensors, as their name claims, detect magnetic fields. They are very useful when a non-contact sensor is needed in a dirty environment where light may be blocked.


Now that we’ve got sensors to detect the items, our PRT232 counter module is the ideal interface to do the actual counting. We can make modifications to the basic counter, such as a display, or special RS232 signal outputs,


If you'd like to subscribe to this blog, please click here.

Categories
Uncategorized

Arduino Programming: Cycle timer

Sometimes you want an operation to repeat periodically. Say you are building a parts washer that circulates cleaning fluid around the dirty parts. The cleaning cycle might run for an hour and in that time you want the circulation pump to run for 10 seconds, stop for 5 seconds for particles to settle, then run for 10 seconds and repeat for an hour.

We need a timer. The type of timer that does this is called a Cycle Timer because it repeats a specific timing cycle and it’s pretty easy to build a cycle timer with an Arduino and a little bit of software programming. We’ll need an Arduino (any kind, from any manufacturer will work), a power supply, the power driver circuit, and the “load” which in this case is our pump.

Let’s get started.

// Which pin to use to control the load const int OUTPUT_PIN = 1; 
// Total number of cycles 
const int NUMBER_OF_CYCLES = 10; 
// On time per cycle in milliseconds 
const int CYCLE_TIME_ON = 5000; 
// Off time per cycle in milliseconds 
const int CYCLE_TIME_OFF = 2000; 

void setup() 
{
 pinMode(OUTPUT_PIN, OUTPUT);
 digitalWrite(OUTPUT_PIN, LOW);
} 

// Run the timer 
void loop() 
{
 int cycles = NUMBER_OF_CYCLES;
 while(cycles-- > 0)
 {
    // Turned timed output on
   digitalWrite(OUTPUT_PIN, HIGH);
   delay(CYCLE_TIME_ON);
   // Turn timed output off
   digitalWrite(OUTPUT_PIN, LOW);
   delay(CYCLE_TIME_OFF);
 }
 // Hold forever
 while(1);
}


If you'd like to subscribe to this blog, please click here.

Categories
Uncategorized

Measuring water flow

A flow meter is the sensor that is used to measure water flow, or the flow of a low-viscosity fluid. There are many different types of flowmeters, but perhaps the most common are turbine or paddlewheel types. In these types of flow meters, a blade spins from the force of the moving fluid. The rotation is detected by a sensor that generates pulses that can be counted by a reader interface.

Older flow meters such as fuel pulsers used a rotating magnet that pulled a tiny reed switch causing the switch contacts to close. Every contact closure results in a pulse at the input of the reader, leading to these flowmeters being called pulsers. There are still thousands of these devices in use.

More modern pulsers and flow meters of all types like the one shown below generate their pulses electronically, often using Hall-Effect sensors that, again, respond to a moving magnet that is spun by a turbine or a paddlewheel.

flow

Now that we have a flowmeter device that can give a pulse output rate that is proportional to the rate that the water or other liquid is flowing at, we need to measure it. The reading device is basically a counter that is calibrated to the pulse rate.

For example, a fuel flowmeter may output 10 pulses per gallon of fuel dispensed, or a flowmeter used for water provides 100 pulses per liter. The reader must understand this calibration so it can display the correct value.

In many cases, the need is to read the flow and record or process the data on a desktop computer. Serial interfaces, RS232 or RS485 and USB are common here. By using a serial port flow meter interface, getting the data into the PC for software processing is a simple task since all modern programming platforms provide some form of serial data communication. Once the data can be received by your software, then you may record it, create graphs, log flow over time, etc.

Cedar Lake Instruments’s PRT232 flow meter interface is a serial port counter flowmeter reader that can measure and record flow. It reads pulser type flow meters, and can switch solenoid valves or pumps to control fluid flow.


If you'd like to subscribe to this blog, please click here.

Categories
Uncategorized

Reading temperature on BeagleBone with AD592

A very common task is to measure temperature at various points. In fact, temperature is the most commonly measured and controlled variable in Process Control. The BeagleBone single-board computer is becoming more popular because of its low cost and sophisticated capabilities. It’s one of the easiest ways to serve up a web page that allows the operator to monitor data and control devices.

Temperature can be measured with a variety of sensors. Here we are concerned with the range of liquids from around 0C to 80C. A straightforward way to measure temperatures in this range is with a semiconductor analog-output sensor. They are easy to use, accurate, and low cost.

I happened to have a number of AD592 temperature to current sensors on hand. These have been traditionally used for process control because their current output makes them very noise resistant when long cable are used. We convert the current (1 microvolt/Kelvin) to a voltage by using a resistor. In this case, we use a 3.3kohm resistor to produce a voltage of around 1V at room temperature. The 3.3k resistor gives a resolution of .003V/Kelvin which with the 273.15K offset gives 0.003V/degree Celsius.

Using the sensor connected to 5V, AGND and the analog input on P9, pin 36, we use this code snippet to read the sensor:

// Read an AD592 temp sensor and return degF
function readTemp()
{
   var volts = 1.8 * trap.analogRead("P9_36");
   // Convert to Kelvin. AD592 outputs 1uV/K
   var k = volts / 3300 / 0.000001;
   // Convert to Fahrenheit
   var f= (k - 273.15) * 9 / 5 + 32;
   // Log the measured values
   console.log("V,k,F: " + volts,k,f);
   return f;
}

For improved accuracy we can measure the actual resistance of the 3.3k resistor and use that measured value in the program.

This concept is easily extended to remote reading. Since the BeagleBone is a powerful little Linux computer, it can be used to serve web pages. We have a simple node.js webserver and sensor data reader program available at this download link


If you'd like to subscribe to this blog, please click here.