Sometimes you just need to do things the old way. A recent post on the Arduino forum was asking about a method to replace the manual speed control potentiometer with something that could be automated. The need was to just replace the pot without replacing the entire control. Since the potentiometer provides a variable voltage to the control circuit, you’d normally use a DAC (Digital to Analog Converter) for this application. We don’t know what voltages may exist internally, so it’s a good idea to isolate the controller from the rest of the circuit. I decided that this could be a good application of a PWM (Pulse-Width Modulated) DAC.
By filtering a PWM signal, we can create a DC voltage. This has the advantage of being a very simple way to produce a variable DC output at low cost using the Arduino. We can use a basic optoisolator like a 4N26 to isolate the Arduino from the rest of the motor control circuit.
Here’s the circuit
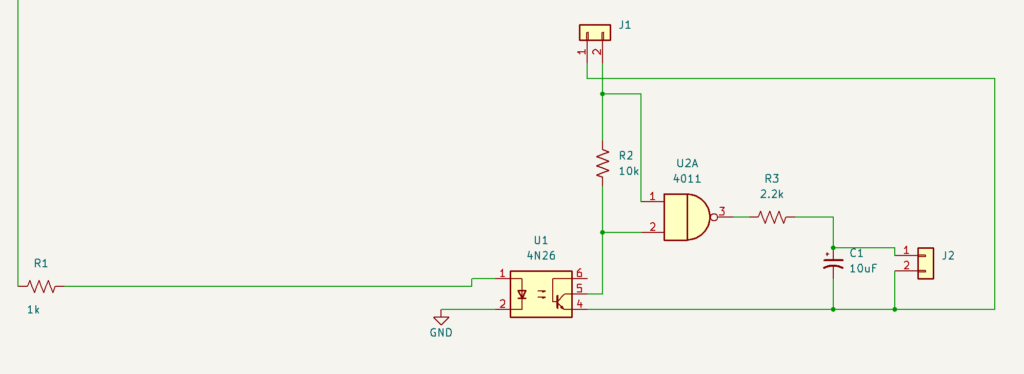
This takes the PWM output from the Arduino at pin 11 and feeds it into an optoisolator through the resistor R1. This protects the Arduino from any high voltage in the motor controller. There approximately 1,000V of isolation between the input pins (1&2) and the output (4&5). R2 is a pullup resistor that gives us +15V at the output of the isolator. Next, we buffer the output of the isolator with a CMOS 4011 AND gate. This is to provide an even drive to the RC filter. By using a 4000-series CMOS gate, we can supply up to 18V output. This is a very old logic series, dating back to the 1970’s but the parts are cheap, easy to find and work pretty well in this kind of application. The main drawback to 4000 series CMOS is that it’s pretty slow, but that doesn’t affect us here.
The output of the NAND gate drives an RC filter (R3, C1) that provides a smooth DC value from the input PWM. J1 provides our 15V power input.
And the code to run it.
const int DAC_PIN = 11;

void setup()
{
  // put your setup code here, to run once:
  pinMode(DAC_PIN, OUTPUT);
}

void loop()
{
  // put your main code here, to run repeatedly:
  for (int i = 0; i < 256; i++)
  {
      analogWrite(DAC_PIN, i);
      delay(5);
  }
}
So you can see here a simple, but interesting method of creating a high voltage, isolated output from the standard Arduino pins.
If you’d like to subscribe to this blog, please click here.