Category: Arduino

  • Make your prop move

    You build this really cool prop. After days, weeks, months of work, it’s done. Just one more thing: it would be so cool if that little bit on top could rotate. But how do you do that? You know motors make things move but you don’t know the first thing about motors. That’s where I come in: I know a fair amount of motors (but I don’t know a whole lot about building great-looking props…).

    OK, now what?

    To make something move, we need a motor. Here’s a simple one to get started with.

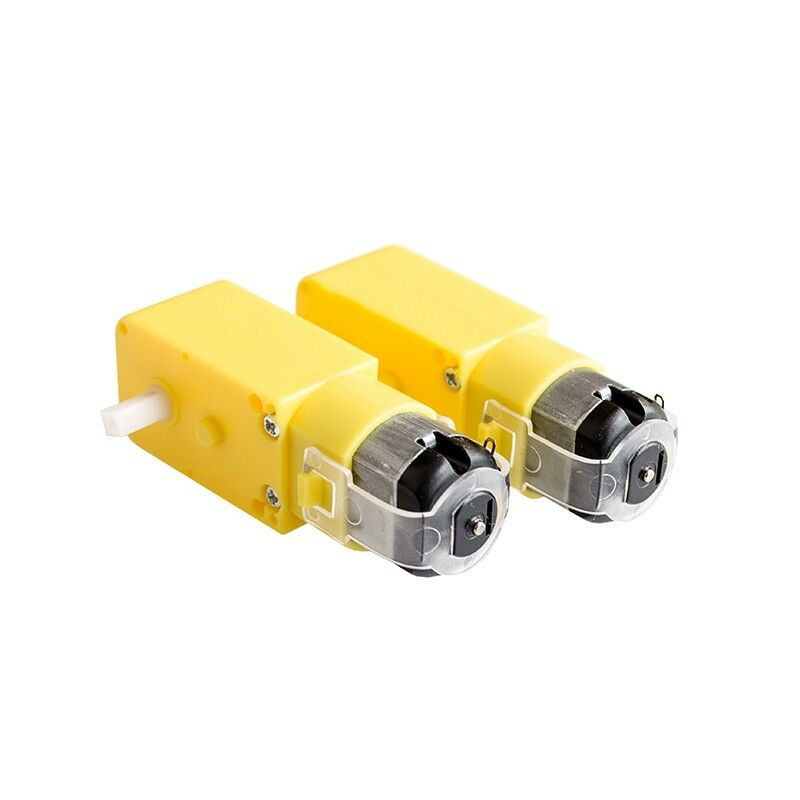
    OK, that’s actually two motors. They’re pretty cheap, so why just get one? I’m not going to post links since they’ll be outdated in seconds, but you can generally find these motors for under $5.00 each all over the web. Search “small gearmotor” and you’ll get tons of hits. These are DC gearmotors. “DC” refers to the fact that they run on Direct Current, such as what you get from a battery, as opposed to AC which is what comes from a wall outlet. A gearmotor is a type of motor that contains a gearbox. Normally, motors spin at pretty high speeds: thousands of rotations per minute(RPMs). With the embedded gearbox, we get a more useful rotation rate that’s generally between 15-100 RPM. Slower or faster speeds are available. The ones above has two output shafts that provide around 140 RPM.

    OK. I’ll post one link: these guys will probably be selling them for a while

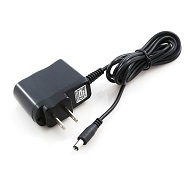
    Now, any motor needs a power source. The sample ones above are small enough that they can be battery powered. Three AA’s will run them for quite a while.

    An important feature of DC motors is that their speed depends on the voltage you give them. If you run these from four AA’s they will run faster than if you ran them from two. Normally, they take 4.5 Volts, which is what you would get from the three AA’s mentioned above. If you want them to run all the time, or just don’t want to be bothered replacing batteries, you can also run them from a 5V “wall wart” power supply.

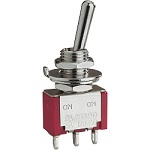
    Once we have the motor and a power source, it might be nice to have an easy way to control it. This is where a switch comes in. It completes or breaks the circuit between motor and power and so turns the motor on or off.

    So let’s put this all together. You know what this needs? A drawing. Drawings that electrical engineers use to show connections are called schematic diagrams. Here’s what it looks like.

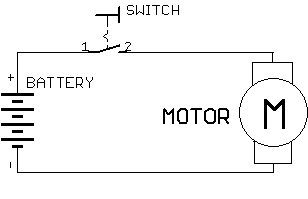
    As you can see there are the three elements we talked about: the battery for power supply, a motor, and a switch to turn it on and off. Look at the symbol for a switch: it shows that the contacts (1&2) are not touching. This means that the circuit is incomplete and current will not flow. When the switch is closed by pushing the shiny arm on top, those contacts will touch and complete the circuit, causing current to flow through the motor and making it move.

    Enough for now? Next time we’ll wire up actual components and see how that goes.


    If you’d like to subscribe to this blog, please click here.

  • Your first Arduino program

    So you’ve been hearing about this Arduino thing and you made the jump and downloaded the IDE since it’s a good first step and doesn’t cost anything. Now what?

    Well, first of all, what’s an “IDE?” An IDE is an abbreviation for Integrated Development Environment. To write code you need a text editor and to program the Arduino device, you need a programmer. The “I” in Integrated means that the application contains both an editor and a programmer. The Arduino IDE is a very basic one but it gets the job done.

    So, what’s a “sketch?” A sketch is the Arduino terminology for a computer program, which is the set of instructions you give a computer to tell it to do something. We also call this “code.” Why the Arduino inventors called a program a sketch I have no idea, but it seems to have stuck.

    void setup()
    {
    }

    The lines above are familiar to anyone who’s written an Arduino sketch. The basic outline of a sketch has two of these blocks called “functions.” A function is a short block of code that can be called, or told to execute from anywhere in your program. The other basic function is “loop” and we’ll get to it later. For now, the important thing to know is that setup is called when the program starts and loop is called repeatedly, over and over.

    Since setup is called at the beginning, it’s the place where we put statements that need to be executed as soon as the Arduino starts up. e.g., we need to tell it which pins we want to use as inputs and outputs, what special configurations they need, and so on. Here’s a basic program that makes pins 2&3 outputs and blinks them five times.

    void setup(void)
    {
        // Set pins 2 and 3 as outputs
        pinMode(2, OUTPUT);
        pinMode(3, OUTPUT);
    
        // Declare a variable for counting
        int i = 0;
        // Turn pins 2 & 3 off 5 times
        // using a for... loop
        for( i = 0; i < 5; i++ )
        {
            // Turn OFF pin 2
            digitalWrite(2, LOW);
            // Turn ON pin 3
            digitalWrite(3, HIGH);
            // Pause for 1000 milliseconds (1 second)
            delay(1000);
    
            // Turn ON pin 2
            digitalWrite(2, HIGH);
            // Turn OFF pin 3
            digitalWrite(3, LOW);
            // Pause for 1000 milliseconds (1 second)
            delay(1000);
        }
        // Turn OFF pin 2
        digitalWrite(2, LOW);
    }

    The short block of code above shows something important that’s often ignored: you can do real work in the setup() function. In fact, for some very short programs that just need to do a task and stop, it’s a good way to write your code.


    If you’d like to subscribe to this blog, please click here.

  • Arduino programming and hardware questions answered

    A surprising amount of my Arduino project building tasks comes from people who have an urgent project and got in way over their head. They’ve selected components, maybe even purchased them. They’ve started learning about the Arduino ecosystem and begun learning to code.

    Then Life Happens. The project has to be pushed back since they don’t have time to learn what they need to, or other issues come up, so they turn to me to redo the job from scratch, or clean it up.

    And sometimes you’re just stuck on a particular problem and you could continue on your own if you became “unstuck.” You can turn to online forums in this case, but they can be hit or miss. Sometimes you get the perfect answer,  but often people online are rude to newcomers, snarky, make you feel unwelcome, or just give bad info. Also, even when you’ve been told “just Google it,” it’s pretty hard to “just Google it” for something technical like an Arduino sensor if you don’t even know what the search terms would be. Does this sound familiar?

    I can help.

    I’ll answer your Arduino questions for a set fee. You will receive polite, respectful, and timely help at reasonable rates. Unlike anonymous forums, we have a vested interested in proving useful help and keeping you happy.

    An example question would be: “why does this function fail after it’s been running for a while? Or, what’s the difference between all these sensors and which one should I select, and why?”

    Generally, if your question is something that’s been asked a thousand times on the online forums, we’ll just point you at an existing answer. Sure, I can tell you “how to control a solenoid with my Arduino” but so, so many people have answered the same question before that it’s better to take advantage of existing resources than to create yet another duplicate.

    Now, clearly with the cost of software development being what it is, we can’t write custom sketches at these prices, but we can point out where a sketch is wrong or should be rewritten. If you need help selecting a peripheral like a solenoid valve or a Photomultiplier tube for your Arduino, we’ll do the research for you. If we feel we can’t do your question justice, you will receive a refund if you’ve prepaid!

    As far as rates go, the price is $25 for a single question, $100/week for one question per day or $350/month for unlimited questions. Consider that last rate a retainer, if you will.

    For some of the more unusual or newer products, we may have to do substantial research, and there are likely going to be a few questions we will have to decline and refund your money because proprietary information that we don’t have access to can be involved. But by and large, I’m sure that the service will help a lot of people be successful with their Arduino projects.

    But I feel it’s worth a try. I know there are people that need questions answered who aren’t getting the assistance they deserve.
    Click on the button below and it will take you to a payment page for the single, $25 answer. I will respond to your question within 24 hours. I also use this $25 level as my “tip jar.” Sometimes when I help someone online (with no expectation of payment), they are so grateful they’d like to reciprocate, so this works to leave a small payment.

    This doesn’t mean we won’t build complete projects any more. That is still an option, but if you just need a quick nudge in the right direction, this is here for you.

    Single Arduino Question


    If you prefer, I am also available for more extended help on codementor


    If you’d like to subscribe to this blog, please click here.

  • To solder or not to solder…

    … that is the question.

    Should you solder connections between your Arduino and external boards?

    Soldering is a method of making electrical and (usually) minor structural connections. It can be a permanent and reliable connection that lasts for decades. Sometimes, however, that can be a drawback since soldered connections make it harder to replace or upgrade external boards when they fail. It’s also not a panacea: while a properly constructed soldered joint can be very strong, the point where the solder ends tends to be brittle and can lead to failures if that section of the wire moves. The typical remedy for this is a strain relief — secure the wire so it can’t move or vibrated.

    Pin and socket connections are a popular alternative to soldering, especially in the Arduino world where many newcomers don’t have soldering experience. They too can be very reliable: a snug fit between pin and socket can be gas-tight and resist corrosion for a very long time. It has a similar drawback to soldered connections when the item is in an area subject to vibration: the wires can come loose. Typical solutions for this are to use cable connectors with ramps, clips, or other locking mechanisms. For the popular Arduino wire jumpers, they can be bundled in groups and secured with wire ties.  By tying them together, they behave more like a single connector with a group of wires and it takes more force to dislodge them. Also, the wire bundle can be secured to a fixed point, so it won’t move.

    Some single-wire terminations such as Faston terminals actually dislodge a small amount of metal when the connection is made. They fit so tightly that no additional wire restraint is needed.

    So solder, or pins for wire to board connection? In the end they’re both quite useful and reliable, but my preference is generally for pin and socket. Their versatility far outstrips the few drawbacks.


    If you’d like to subscribe to this blog, please click here.

  • Connect bill acceptor or coin acceptor to PC

    One interesting application for our PRT232 pulse counter is reading bill acceptors and coin acceptors from a desktop computer.

    A coin acceptor is used to pay for a product or service. You’re probably quite familiar with them from using commercial laundry machines or video game arcades. In these situations, they are built into the equipment. However we are seeing an increase in cases where someone is adding a payment facility via a bill acceptor or a coin acceptor to equipment that was not designed for it. An example would be a kiosk that dispenses water. There are many of these in grocery stores where you can fill up your bottle with pure water and then pay for it at the counter. But many entrepreneurs are taking water dispensers and making it possible for the customer to pay directly at the point of sale.

    These acceptors work by sending a number of pulses corresponding to the coin or bill that is entered. e.g., a quarter may provide a single pulse while a dollar bill gives four pulses. Our pulse counting devices are obviously a natural fit for the application. They will accept the pulse output from the coin acceptor, count the pulses and provide a  serial RS232  interface to the PC making it simple to tally the dollar amount entered.

    By using a counter to RS232 device like our PRT232 or PRT232F (6 count inputs), now the PC computer can be used to track usage, make automated daily reports, provide the customer enhanced user interface and so improve your sales performance.

    We provide a sample of software that uses the PRT232 as a dispense controller. It can be easily modified for your own use. We also offer custom software and hardware development in this area.

    One example of what we have done is the situation when the bill acceptor must be connected to a machine that doesn’t correspond exactly with its operation. For example, perhaps you are building a vacuum cleaner that the operator pays to use (as often found at a car wash). The vacuum may have been designed to start with a contact closure, but in order to use your coin acceptor, you must translate the four pulses from four quarters being deposited into a single output. We have designed electronics to solve exactly this situation. If you need something similar, contact us.


    If you’d like to subscribe to this blog, please click here.

  • Arduino Programming: hydraulic shock control from pushbutton

    This was a response to an online request for help with code. A single  pushbutton cycles through three hydraulic damper valve settings. The code was too long to post on the site, so I’m showing it here.

    As of today, I don’t know if it will work, but it explains the concept. I will get it working as time permits

    // Digital output definitions
    #define RED_OUTPUT 0
    #define BLUE_OUTPUT 1
    #define GREEN_OUTPUT 2
    
    // Digital input definitions
    #define SWITCH_INPUT 3
    
    // Define states
    #define RED 800
    #define BLUE 801
    #define GREEN 802
    
    // Define message types
    #define NONE 901
    #define CLICK 902
    #define PRESS 903
       
    // Global state
    int _state = GREEN;
    
    // One-time call to initialize system
    void setup()
    {
       pinMode(SWITCH_INPUT, INPUT_PULLUP);
       pinMode(RED_OUTPUT, OUTPUT);
       pinMode(BLUE_OUTPUT, OUTPUT);
       pinMode(GREEN_OUTPUT, OUTPUT);
       // Enable GREEN state
       digitalWrite(GREEN_OUTPUT, HIGH);
    }
    
    // Continuously called by Arduino runtime
    void loop()
    {
       // Read pushbutton
       int message = readSwitch();
       // Update LEDs and hydraulic valve if state changed
       if (processState(message))
       {
          activateOutput(_state);
       }
    }
    
    // Read pushbutton and return the result
    int readSwitch()
    {
       const int CLICK_UPPER_LIMIT = 200;
       const int CLICK_LOWER_LIMIT = 25;
       const int PRESS_LOWER_LIMIT = 1000;
       const int PRESS_UPPER_LIMIT = 2000;
    
       int switchMessage = NONE;
       unsigned long start = micros();
       while (digitalRead(SWITCH_INPUT) == LOW);
       unsigned long duration = micros() - start;
       if (duration < CLICK_UPPER_LIMIT && duration > CLICK_LOWER_LIMIT)
       {
          switchMessage = CLICK;
       }
       else if (duration > PRESS_LOWER_LIMIT && duration < PRESS_UPPER_LIMIT)
       {
          switchMessage = PRESS;
       }
       return switchMessage;
    }
    
    bool processState(int message)
    {
       static int lastState = GREEN;
       int retVal = 0;
    
       // PRESS overrides CLICK in all states
       if (message == PRESS)
       {
          _state = GREEN;
       }
       else
       {
          // Process states
          switch (_state)
          {
             case RED:
                if (message == CLICK)
                {
                   _state = BLUE;
                }
             break;
                
             case BLUE:
                if (message == CLICK)
                {
                   _state = RED;
                }
             break;
                
             case GREEN:
                if (message == CLICK)
                {
                   _state = RED;
                }
             break;
                
             default:
             break;
          }
       }
       // Did state change?
       retVal = (lastState == _state);
       // Remember this state
       lastState = _state;
       // Return state changed information
       return retVal;
    }
    
    void activateOutput(int thisState)
    {
       // Since this is only called on state change, OK to turn everything off first
       digitalWrite(RED_OUTPUT, LOW);
       digitalWrite(GREEN_OUTPUT, LOW);
       digitalWrite(BLUE_OUTPUT, LOW);
       // Turn on only the output corresponding to the state
       switch (thisState)
       {
           case RED:
             digitalWrite(RED_OUTPUT, HIGH);
             break;         
           case BLUE:
             digitalWrite(BLUE_OUTPUT, HIGH);
             break;      
           case GREEN:
             digitalWrite(GREEN_OUTPUT, HIGH);
             break;
          default:
             break;
       }   
    }

    If you’d like to subscribe to this blog, please click here.